Architecting a Modular Home Lab: A Systems Engineering Playground
A technical retrospective on building a secure, modular home lab using Proxmox, Docker, and Tailscale to create a dedicated systems engineering playground.
Every computer science student knows the lingering anxiety of executing a complex command on their primary workstation. When your interests lean heavily toward systems engineering and system administration, your daily driver inevitably becomes a minefield of conflicting dependencies, half-finished container deployments, and risky network configurations.
I needed a blast radius. I needed a dedicated environment where I could freely deploy, test, break, and rebuild professional-grade architectures without the fear of bricking the machine I use to write code and complete assignments.
This post details the 2026 iteration of my home lab. It is a living playground designed for continuous learning, acting as both a production environment for the services I rely on daily and an ephemeral testing ground for new technologies.
(Note: If you are looking specifically for how I handle automated media acquisition and streaming, I detailed my entire Arr-stack in a previous post here. This post focuses purely on core infrastructure, routing, and developer utilities).
The Iron: Doing More With Less
When people hear “home lab,” they often picture massive, power-hungry enterprise server racks humming in a basement. The reality is that you can simulate enterprise-level architecture on highly efficient, compact hardware.
My entire infrastructure runs on a single HP EliteDesk.
- CPU: Intel Core i7 (8th Gen)
- RAM: 32 GB
- Storage: 250 GB SSD (Boot/System) + 500 GB SSD (Data/VM Storage)
It is a modest footprint, but with 32GB of memory and solid-state storage, it provides more than enough overhead to run a hypervisor, multiple virtual machines, and dozens of containerized services simultaneously.
The Foundation: Proxmox VE and the Virtualization Strategy
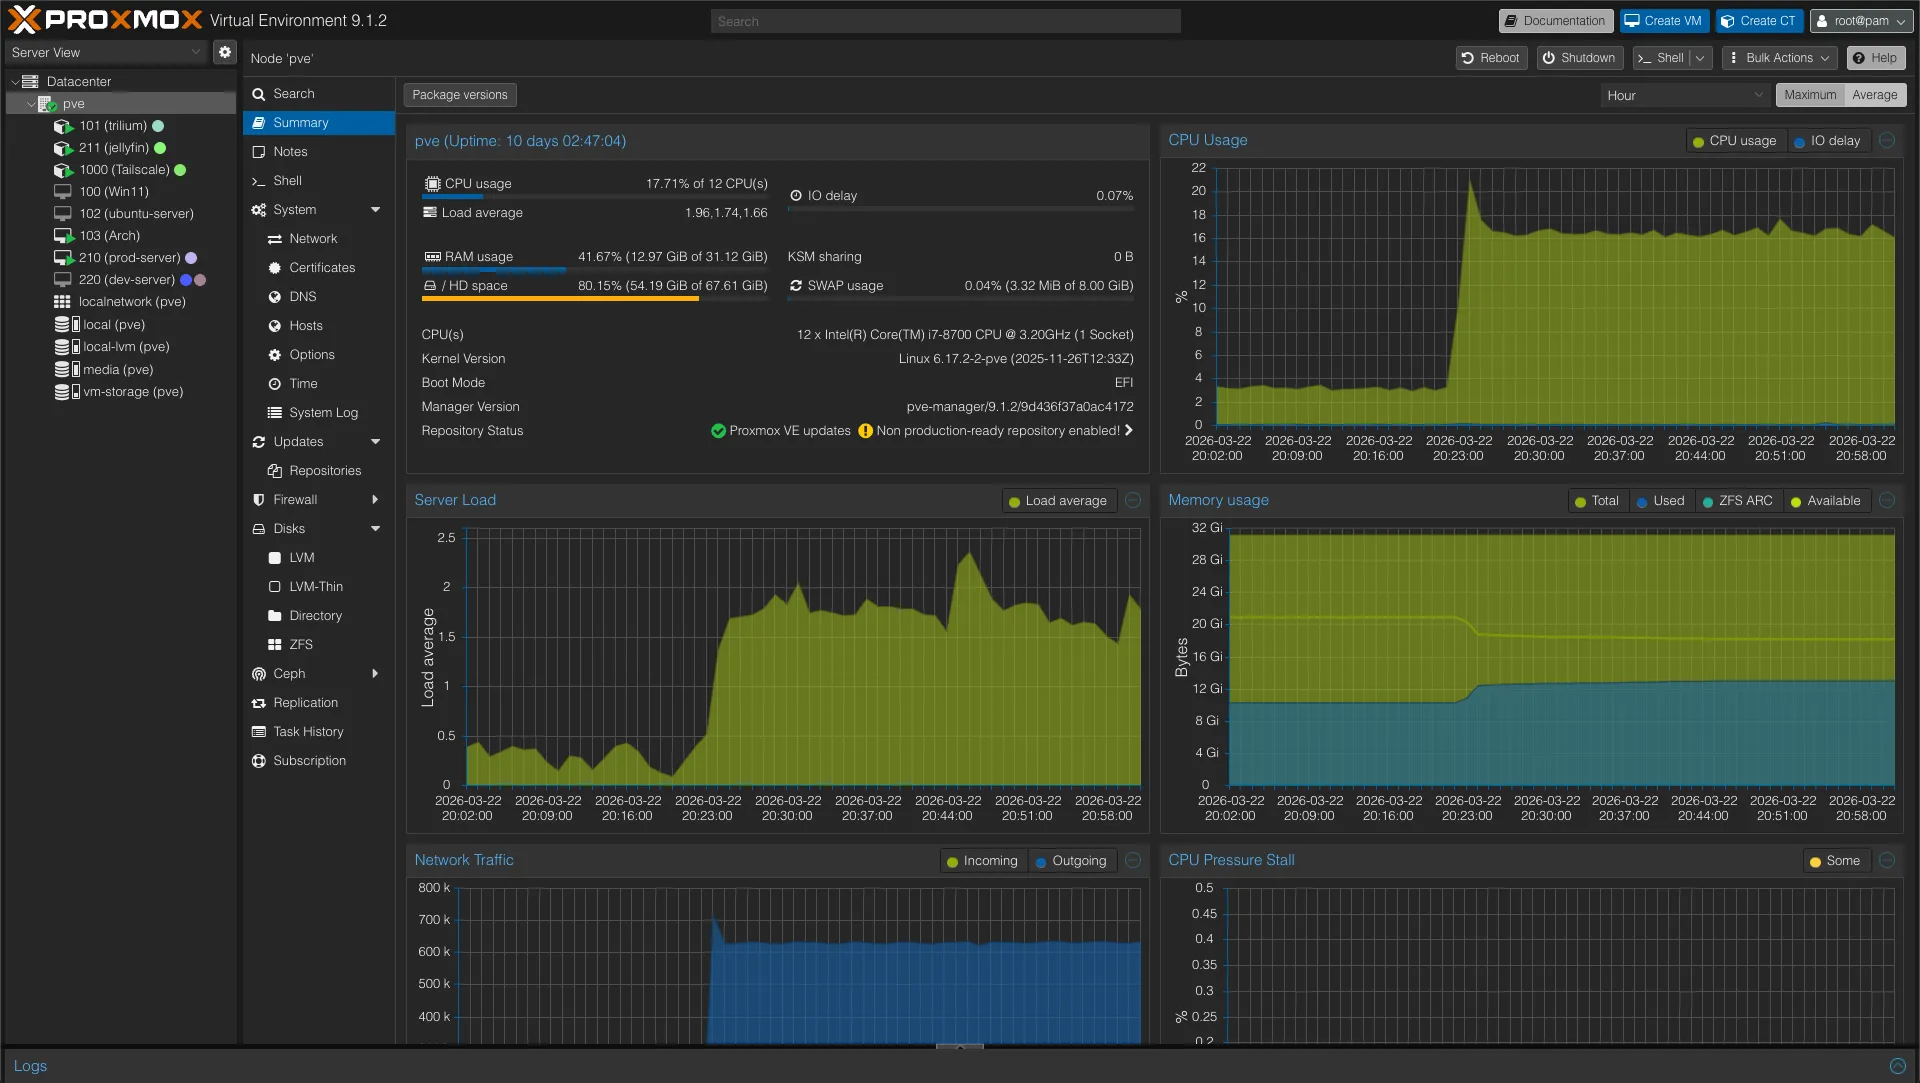
To treat this hardware like a true data center node, running a standard Linux desktop distribution was out of the question. I needed a Type-1 hypervisor. I chose Proxmox VE because it offers a professional-grade environment that makes spinning up and tearing down environments incredibly fast.
Because I only have one physical host and limited storage, I do not rely on a dedicated NAS or ZFS pools. Instead, I utilize Proxmox LVM, mounting the secondary 500GB SSD to handle the bulk of the virtual disks and data pools.
My virtualization strategy is strictly categorized to prevent my experimental projects from taking down my production services:
- The Production Node (
prod-server): An Ubuntu Server VM. This is the bedrock of the lab. It runs the Docker Engine hosting all my daily-driver utilities, reverse proxies, and dashboards. If this goes down, my infrastructure is essentially offline. - The Staging Node (
dev-server): A secondary Ubuntu Server VM. This is where I test heavy deployments before they ever touch production. For example, I recently deployed a full GitLab instance here. After evaluating its massive resource footprint, I decided against keeping it. Having a dev-server allowed me to make that assessment safely. - The Daily Driver: A dedicated Arch Linux VM that serves as my primary machine and development environment.
- The Windows Environment: A Windows 11 VM kept strictly for software that refuses to play nicely with Linux.
- Ephemeral VMs: If I just need to test a single script or an isolated service once, I spin up a temporary VM, run the test, and immediately destroy it.
LXCs for Specialized Workloads
While VMs offer great isolation, they come with the overhead of a full operating system. For specific workloads, I utilize Proxmox Linux Containers (LXCs):
- Hardware Access: My Jellyfin server runs in an LXC rather than a Docker container inside the
prod-server. This gives it direct, low-friction access to the Intel Quick Sync Video (QSV) capabilities of the i7 processor for hardware transcoding. - Standalone Services: I run my Trilium note-taking application in its own LXC for dedicated resource allocation, completely decoupled from the Docker environment.
This hypervisor-first approach gives me the ultimate flexibility. I have the isolation of a professional IT environment, the speed of ephemeral testing, and the stability required to actually rely on the services I host.
The Network Backbone & Storage Philosophy
With the hypervisor allocating resources, the next architectural challenge was determining how data is stored and how the network is accessed.
Data Persistence: Taking Control with Bind Mounts
In the Docker ecosystem, the standard advice is often to use Docker Volumes. However, for a single-node setup with limited storage, I explicitly chose to use Bind Mounts for all my container data.
By mapping container directories directly to specific paths on my Ubuntu host (e.g., ./config:/app/config), I keep the control in my hands, not Docker’s. This makes file migrations trivial and simplifies my backup strategy immensely. I can easily compress the entire infrastructure directory, knowing exactly where every configuration file and database sits on the host filesystem.
Secure Remote Access: The Tailscale Hybrid Approach
Exposing services directly to the public internet is a security nightmare. Instead, my entire infrastructure is wrapped in a Tailscale mesh network.
My approach to Tailscale is a hybrid one:
- Direct Installation: My core, permanent virtual machines (like the Arch daily driver and the Ubuntu
prod-server) have the Tailscale client installed directly on the OS. This securely adds them to the tailnet with their own dedicated IP addresses. - The Subnet Router LXC: Installing Tailscale on every single ephemeral testing VM or physical device on my local network is inefficient. To solve this, I deployed a dedicated, unprivileged LXC in Proxmox acting as a Tailscale Subnet Router.
This LXC advertises my local LAN subnets to my tailnet. If I spin up a temporary VM for a one-off test, I do not need to configure Tailscale on it. As long as I am connected to my Tailscale network from my laptop at a coffee shop, the subnet router seamlessly forwards my traffic to that temporary VM as if I were sitting on my local Wi-Fi. It is the perfect balance of strict security and developer convenience.
Traffic Control: Ingress and the DNS Dilemma
Once the hypervisor and networking backbone were in place, I needed a way to route traffic cleanly to my services.
For ingress, I rely on Traefik. It acts as the reverse proxy for the entire infrastructure. Setting up Traefik was surprisingly painless. The documentation out there is excellent, and using Docker labels to automatically route container traffic is essentially magic. Even routing traffic to external, non-Docker services (like the Proxmox web UI or the Jellyfin LXC) using Traefik’s external file provider (config.yaml) was straightforward.
Traefik handles the SSL certificates via Cloudflare DNS challenges, ensuring everything is served over HTTPS without exposing ports 80 or 443 to the open web. But routing HTTP traffic is only half the battle. The real boss fight of this home lab build was DNS.
Pi-hole and the Sticky DNS Problem
I run Pi-hole on the host network of my production VM to handle local DNS resolution and network-wide ad blocking. I love having my own DNS resolver, so I initially configured Tailscale to override my client DNS. This meant that even if I was sitting in a cafe on my laptop, all my DNS queries were routed back through the Tailscale tunnel to my home Pi-hole.
It worked flawlessly—until my server lost power while I was away from home.
I knew the server was down, so I simply toggled Tailscale off on my laptop, expecting it to revert to the cafe’s default DNS. It did not. My machine aggressively held onto the now-dead Pi-hole IP. I tried disconnecting from the Wi-Fi, forgetting the network, and flushing the DNS cache via the terminal. Nothing worked. The OS absolutely refused to drop the dead DNS record, leaving me without internet access until I manually forced the network adapter to use a public DNS.
The Circular Dependency of Death
The second major DNS headache happened after another power outage. I had spent hours configuring auto-start orders, auto-mounts, and boot delays so the server could recover gracefully from a hard crash. Usually, this worked perfectly. This time, the server booted, but none of the VMs or services could access the internet—or each other.
When internal services cannot communicate, it is almost always a DNS issue. I restarted the Pi-hole container. I restarted the production VM. I restarted the entire physical server. The gridlock persisted.
After digging through the system logs, I finally found the culprit: a circular DNS dependency.
On this specific boot, the Pi-hole container was unusually slow to start. However, all the other services—including the Tailscale daemon running on the VM—started up immediately and began looking for DNS resolution. Because Pi-hole was not ready, the system defaulted to the Tailscale fallback DNS. The problem? I had configured Tailscale’s DNS to point right back to my local Pi-hole.
Tailscale was asking Pi-hole how to route traffic, but Pi-hole could not finish booting because the Docker engine itself was struggling to resolve networks. It was a perfect, inescapable loop.
The Fix: Split DNS
Fixing this required a fundamental change in how I handled network resolution:
- Strict Startup Orders: I enforced stricter dependencies in Docker Compose and Proxmox to ensure Pi-hole is fully healthy before downstream services attempt to boot.
- Hardcoded Fallbacks: I hardcoded reliable upstream DNS fallbacks for critical host-level services so the machine itself never gets stranded.
- Split DNS over Override: The silver bullet was changing my Tailscale configuration from a global “Override” to “Split DNS.” Now, Tailscale only routes queries for my specific home lab domains (
*.darni.org) to Pi-hole. All other standard web traffic uses whatever local DNS the device is currently connected to.
This hybrid approach solved the sticky DNS issue on my laptop and completely eliminated the circular dependency risk on the server. If the lab goes down, I only lose access to my self-hosted tools; the rest of the internet stays online.
The Services Tour: My Daily Drivers
A home lab is ultimately only as valuable as the software running on it. It is easy to fall into the trap of spinning up containers just because you can, resulting in a bloated server full of forgotten dashboards. My philosophy is simple: if a service does not provide regular, tangible value to my workflow or daily life, it gets removed.
What remains on the prod-server is a highly curated list of daily drivers. Here is a look at the application layer of the lab.
Infrastructure & Observability
Before I can host fun utilities, I need to know the server is healthy and manageable.
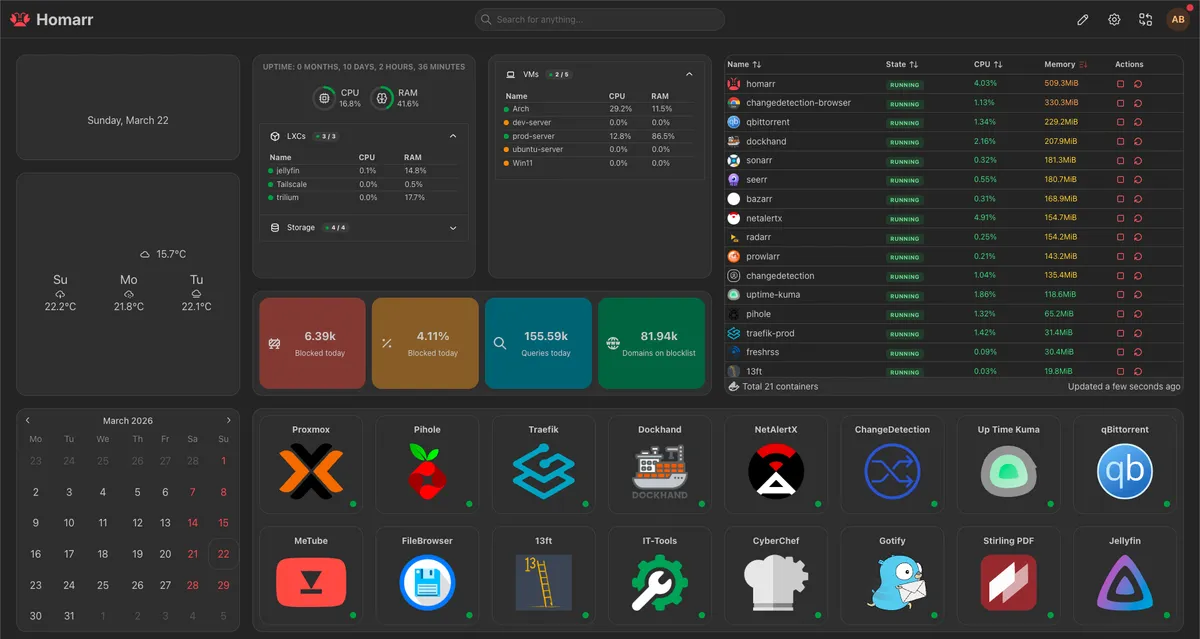
- Homarr: The front page of my home lab. It aggregates all my services into a clean, unified dashboard with integrations for Docker and Proxmox. It is the first thing I see when I open my browser.
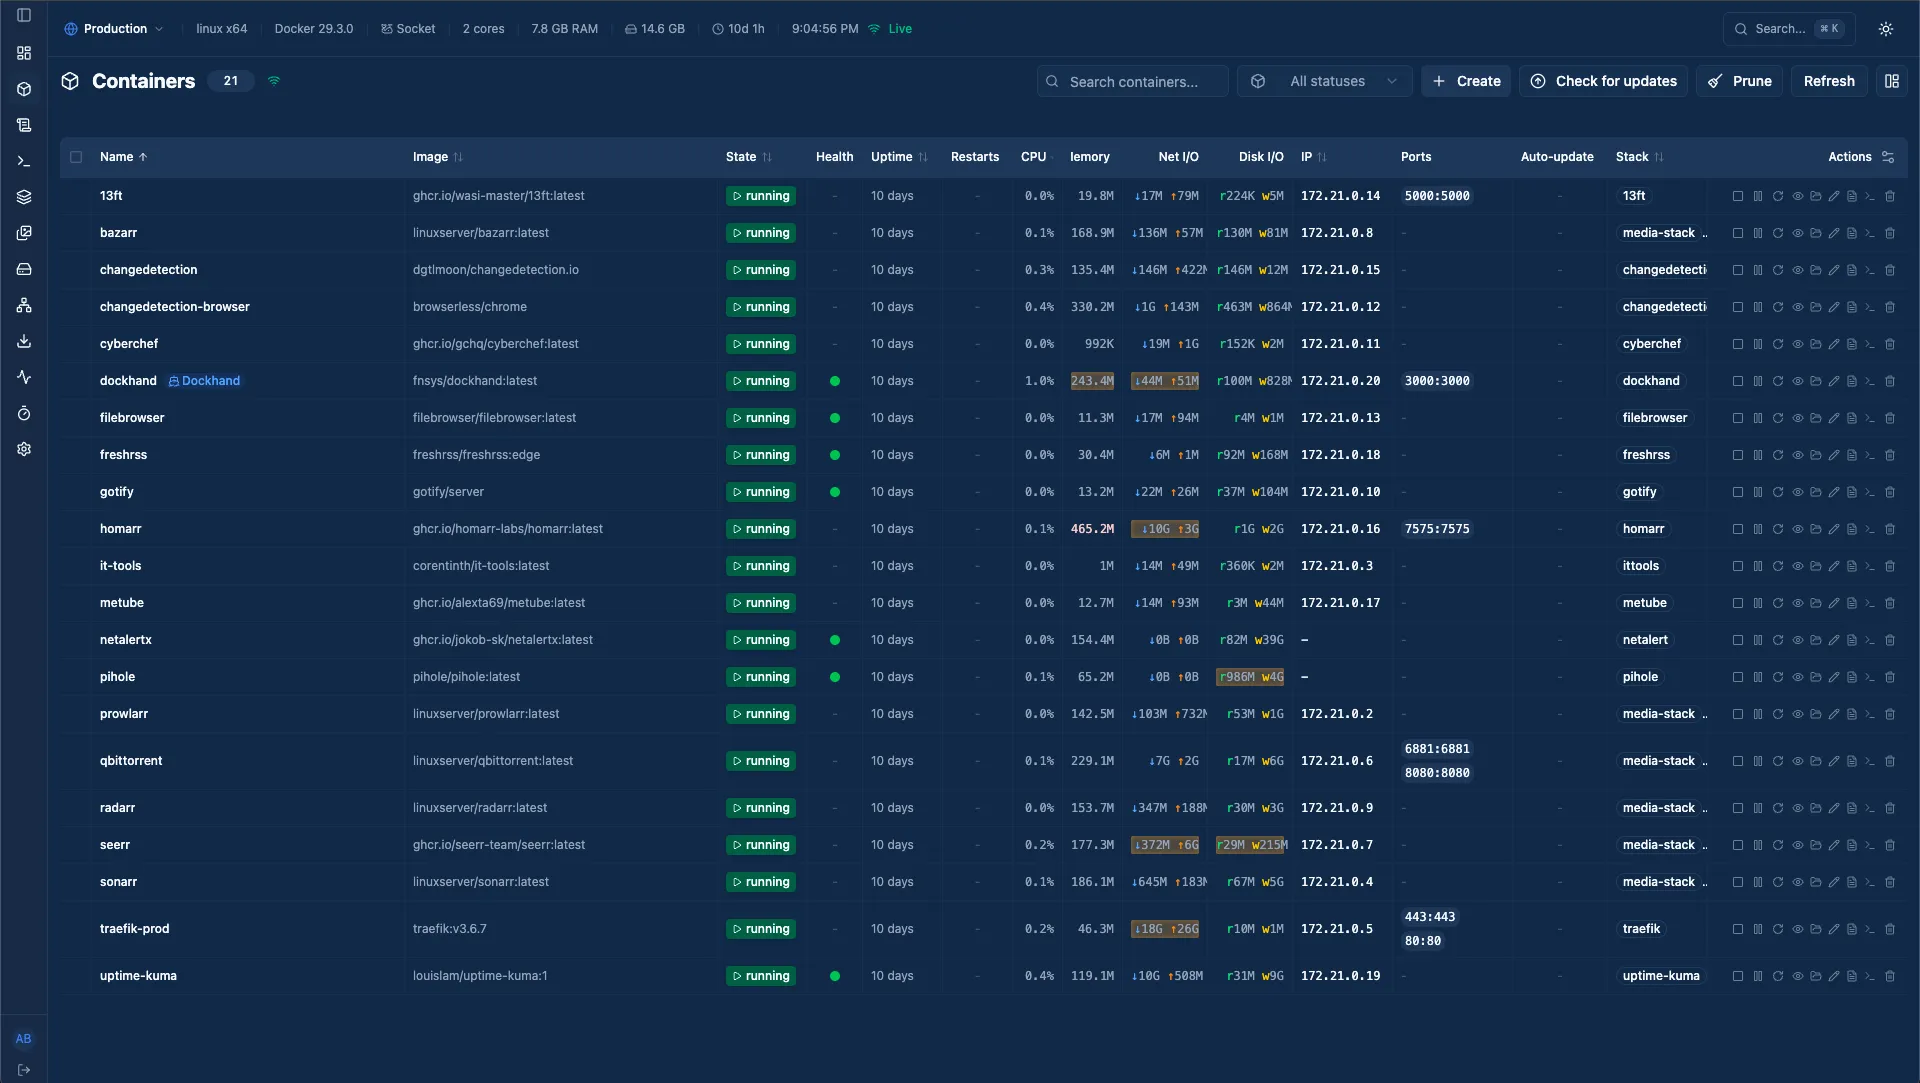
- Dockhand & Hawser: If I had to highlight one recent discovery, it is Dockhand. It is an incredibly clever, lightweight tool for managing Docker containers and stacks through a web UI. Paired with Hawser to securely expose the Docker socket, it gives me Portainer-like control without the heavy overhead. It completely streamlined how I update and manage my Compose files.
- Uptime Kuma & Gotify: My observability stack. Uptime Kuma monitors internal endpoints (like the DNS resolver) and external services. If something drops, it immediately fires a push notification to my phone via Gotify, a self-hosted notification server.
- NetAlertX: An excellent network security scanner. It maps my LAN and alerts me the second an unknown device connects to my Wi-Fi or local network.
- Pi-hole: Despite the DNS trauma I mentioned earlier, Pi-hole is arguably the most critical quality-of-life service on the network. It strips out ads, trackers, and telemetry at the DNS level before they ever reach my devices. Browsing the modern web without it feels completely broken now.
The Developer Utility Belt
As a computer science student, having a suite of tools hosted locally saves an immense amount of time. I do not have to worry about pasting sensitive code or data into random third-party websites.
- IT-Tools: An absolute Swiss Army knife for developers. It has everything from JWT decoders and hash generators to regex testers and JSON formatters, all packed into a single, offline-capable interface.
- CyberChef: Originally built by GCHQ, this is my go-to “cyber operations” tool. I use it for heavy data manipulation, decoding complex encodings, and analyzing suspicious files or text strings.
- Stirling-PDF: PDF manipulation used to mean dealing with terrible free software or uploading personal documents to sketchy online converters. Stirling-PDF lets me merge, split, compress, and edit PDFs entirely locally.
- 13ft: A clean, self-hosted proxy to bypass soft paywalls and strip away bloated web page formatting, allowing me to actually read technical articles in peace.
Productivity & Data Sovereignty
These are the services that manage my personal data and media, keeping me independent from Big Tech ecosystems.
- Vaultwarden: The most critical piece of software I run. It is a lightweight, self-hosted alternative to the Bitwarden server, managing all my passwords, 2FA tokens, and secure notes.
- FreshRSS: With the death of the chronological timeline on social media, I moved entirely to RSS for technical blogs, news, and project releases. FreshRSS aggregates it all beautifully.
- Filebrowser: A simple, fast web interface for managing files on the server directly from my browser, saving me from having to SSH and use
mvorcpfor basic file organization. - MeTube: A web frontend for
yt-dlp. If I need to archive a tutorial, a lecture, or a reference video, I drop the link here, and it downloads directly to my server’s storage. - ChangeDetection.io: I use this to monitor specific web pages for changes. It is incredibly useful for tracking software releases, university announcements, or even hardware stock drops.
The Crown Jewel: Daily Driving an Arch Linux VM
Before I wrap up, I have to talk about the Arch Linux VM. It is the machine I am most proud of in this entire setup, mostly because of how much pain it caused me.
Before migrating to Proxmox, this server’s physical hardware ran Ubuntu. I tried to daily drive it, but it just never clicked. I jumped between KDE, GNOME, and various other desktop environments, but nothing felt quite right. I knew what I wanted, but none of the out-of-the-box solutions offered it.
So, I did what any aspiring systems engineer does when they want to make their life unnecessarily difficult: I installed Arch Linux and decided to build my own environment from scratch using Hyprland.
It took me roughly a month and a half to get everything configured exactly how I liked it—right down to mapping my keybinds to match my MacBook so my muscle memory wouldn’t short-circuit when switching devices. Naturally, as soon as I perfected the setup, Hyprland dropped an update that broke everything. If you decide to use Arch (by the way), you quickly become accustomed to things randomly breaking and having to build packages from source. Despite the headaches, it was incredibly enjoyable. My dotfiles are heavily customized, managed with GNU Stow, and available here (though they are likely out of date).
I daily drove that bare-metal Arch setup for over a year. Then, I registered for a university course that required Windows. At the time, Microsoft didn’t offer an ARM-based Windows ISO that I could run on my Mac, so I had to put Windows on the server. That necessity is what ultimately pushed me to install Proxmox.
The Migration and The Headless Display Nightmare
My initial plan was to simply export my physical Arch drive to a Proxmox VM. I tried everything, but because I had originally formatted my root partition as BTRFS, the virtualization conversion completely failed.
I ended up having to do a fresh install inside the VM. Thankfully, because I break Arch so often, I had already written a private deployment script that pulls my dotfiles via GNU Stow and essentially brings a fresh install back to life automatically.
The real question became: How do you comfortably daily drive a headless virtual machine?
Inhales deeply.
I could have chosen an easy, perfectly passable remote desktop application like RustDesk. Instead, I chose Sunshine (the host) and Moonlight (the client).
Why? Because I read and write a lot of code, and I wanted the incredibly low latency and high-resolution text rendering that Sunshine provides.
Installing it did not work. Building it from source did not work. I ultimately had to modify the source code to account for the VirtIO-GPU drivers Proxmox uses. Finally, it compiled. I tested it, and it worked flawlessly… but only if I was already logged into the VM and started the Sunshine daemon manually.
I could not see the login screen remotely. Sunshine had no display to capture because Hyprland (the compositor) wasn’t running yet. Hyprland wasn’t running because I was stuck at the login screen.
“Simple,” I thought. “I will just write an auto-login script that boots Hyprland, starts Sunshine, and immediately locks the screen with Hyprlock.”
It didn’t work. To this day, I don’t remember exactly why the lock screen completely derailed the display capture (which is exactly why I am starting this blog: to document these absurd troubleshooting rabbit holes).
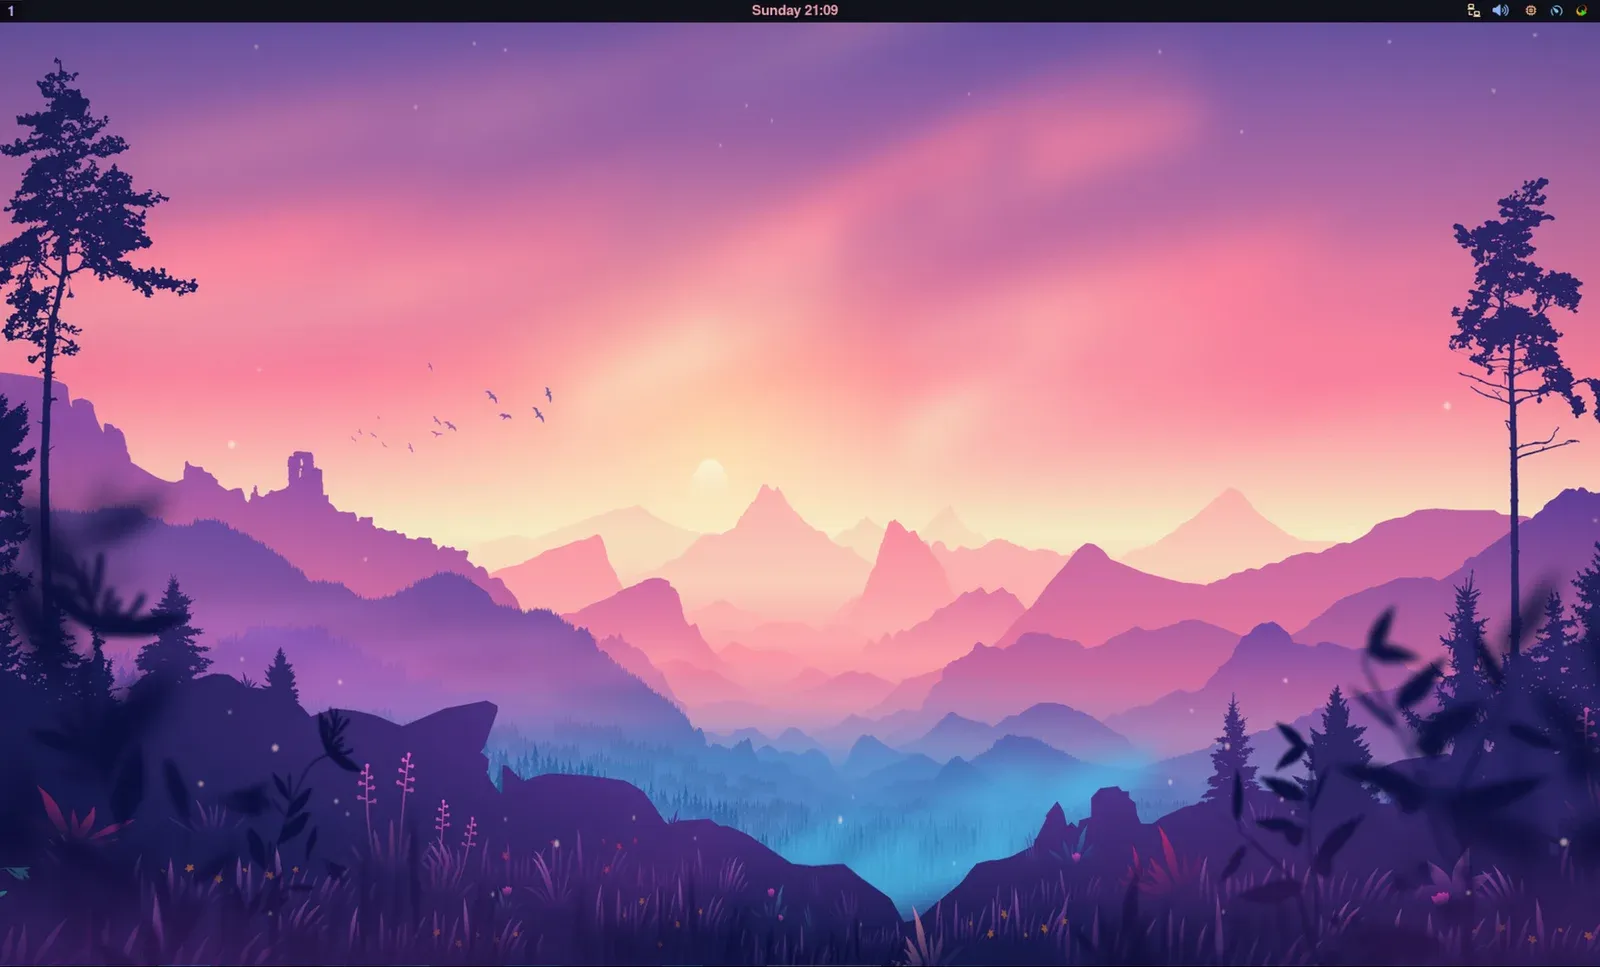
Eventually, I disabled Hyprlock entirely and wrote a custom script that manually launches Hyprland, waits specifically for the display server to initialize, and only then starts the Sunshine daemon. I also vaguely remember having to rip out hyprpaper and replace it with swww just to get the background rendering to play nicely with the stream.
It was a nightmare to engineer, but the result is a perfectly fluid, high-resolution Arch Linux desktop streaming to my laptop from a headless hypervisor.
The Wrap-Up
Building this home lab has been the single most effective way I have learned about systems engineering, network routing, and infrastructure as code. Reading about DNS resolution loops or hypervisor resource allocation in a textbook is one thing; staying up until 2:00 AM because a perfectly healthy Pi-hole container trapped your entire server’s network in a circular Tailscale dependency is an entirely different level of education.
The architecture documented here works perfectly for my needs today, but if there is one thing I have learned, it is that a home lab is never truly “finished.” The hardware will age, new software will be released, and I will inevitably break something while trying to optimize a configuration file.
If you are interested in the specific Docker Compose files and .env structures I use to run the services mentioned in this post, I have sanitized and uploaded all of my templates to GitHub.
Link to Home Lab Docker Templates Repository
Thanks for reading, and good luck with your own deployments.